Picture to build

Image to Minecraft build: turn one picture into a 3D schematic

Give our AI a single reference picture and it rebuilds the subject as a full Minecraft structure, starting from the floor plan. You get a furnished build on shaped terrain, a 3D preview with real blocks and a .schem for WorldEdit.

Free to start · No credit card

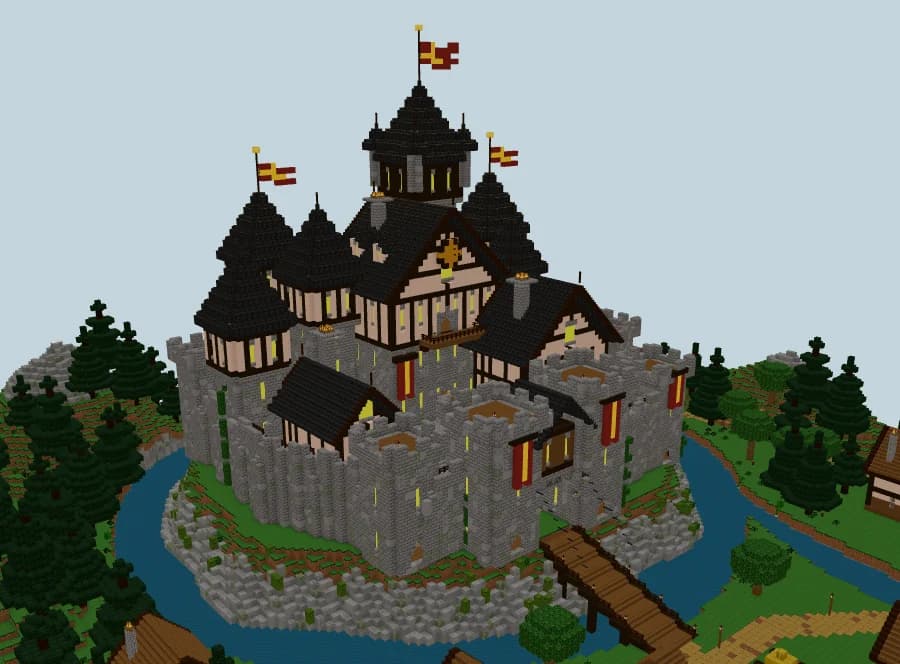
Minecraft castle on a rocky island rebuilt in blocks by AI from a single reference image, shown in 3D

A 3D build, not pixel art

The picture becomes a volume with walls, roofs and rooms, not a flat wall of colored blocks.

Reads the whole scene

Silhouette, roof lines, materials and surroundings all feed the build, including trees, rocks and terrain.

Hidden sides filled in

From one view, the AI builds the faces you cannot see so they stay consistent with the visible ones.

Straight to .schem

Check the result in 3D, then download a Sponge v3 schematic that WorldEdit and FAWE can paste.

What converting an image to a Minecraft build really means

Many tools that promise to turn a picture into Minecraft produce map art: the image is resampled into a flat grid of colored blocks. That is useful for a mural, but it is not a building. Spaleforce does something different. The AI looks at what the picture shows, a castle, a chapel, a cabin, and constructs that subject in three dimensions.

The result has thickness, floors, a roof you can walk under and rooms you can enter. The rooms are furnished, and the scene around the building is dressed with trees, rocks, vegetation and lighting, so the picture becomes a place rather than a poster.

Which pictures work for a picture to Minecraft build

Almost any image with one clear architectural subject can serve as a reference. These kinds of pictures give the best starting points:

Images that are mostly people, close-ups of a texture or dense city skylines give the AI little to build from. When a picture shows ten buildings, crop it to the one you want.

  • Concept art: fantasy castles, villages and temples drawn with clear shapes and a readable palette.
  • Photos of monuments: cathedrals, lighthouses, towers, historic houses shot from the street.
  • Screenshots from other games: a keep, a tavern or a ruin you liked while playing something else.
  • Sketches: a clean drawing can work when the outline and roof lines are easy to read.

How the AI reads your photo before placing blocks

The first thing the AI works out is the floor plan. From the perspective in the picture, it estimates the footprint: where the walls stand, how the towers and wings connect, where the courtyard or garden sits. Only then does it raise the structure.

Next come the heights and the roof lines, then the facades: window rows, trims, timber framing, changes of material. Colors and textures in the picture are matched to real Minecraft blocks with a coherent palette, so a gray slate roof becomes dark tiles, not a random mix. Interiors, decor and terrain follow.

The build is assembled in stages, and you can replay those stages in the 3D preview. It shows how the picture was interpreted, from the first outline on the ground to the last lantern.

Tips for a reference picture that converts well

A few choices when picking the image make a visible difference in the result:

If you do not have a suitable picture, you can describe the scene in words instead. The prompts below are written for that case.

  • Show the whole building, roof included. Cropped towers give the AI nothing to go on.
  • Prefer a three-quarter view. Seeing two faces at once tells the AI much more about depth than a flat front view.
  • Pick even lighting. Deep shadows and night shots hide materials and window lines.
  • Avoid heavy text, logos and watermarks over the subject.
  • Use images you have the right to use, especially if the build ends up on a public server.

Limits of photo to schematic conversion

A single picture only shows one side of a building. The AI invents the back and the hidden sides, keeping them consistent with what it sees: same materials, same roof style, same window rhythm. They will look right, but they will not match the real monument if you are rebuilding a landmark from one photo.

Minecraft is a block grid, so very thin details such as fine tracery, cables or delicate railings are simplified. Materials are limited to real Minecraft blocks, so an unusual stone or a glass facade is translated into the closest palette. Expect a faithful interpretation, not a scan.

From your image to a schematic in your world

Once the build is ready, inspect it in the 3D viewer, which uses the real Minecraft block models. Then download the .schem file (Sponge v3) and paste it with WorldEdit or FastAsyncWorldEdit using //schem load followed by //paste.

Our showcase, the Citadelle du Val-d'Or, came out of exactly this process: one reference image in, a castle with dark spires on a rocky island, water, a village and mountains out. If your starting point is a 3D model rather than a picture, our free OBJ to .schem converter is the better tool.

How it works

  1. 1

    Choose one clear picture

    Concept art, a monument photo, a game screenshot or a clean sketch, with the whole building visible.

  2. 2

    Upload it

    The AI reads the view, works out the floor plan and builds the structure, roofs, facades, interiors, decor and terrain.

  3. 3

    Review the result in 3D

    Orbit around the build, check the hidden sides and replay the construction step by step.

  4. 4

    Download the .schem

    Paste it in your world with WorldEdit or FAWE.

No picture at hand? Describe the scene instead

Lighthouse on a cliff
A white and red striped lighthouse on a rocky cliff above the sea, with a keeper's cottage in stone and spruce, a furnished kitchen, a winding path and lanterns.
Gothic chapel
A small gothic chapel in stone bricks with pointed windows, a tall bell tower, dark slate roofs, pews and candles inside, and a graveyard with old trees around it.
Mountain tavern
A two-story timber-framed tavern on a mountain road, with a stone ground floor, a bar and tables inside, rooms upstairs, barrels outside and pine trees behind.
Japanese-style pagoda
A five-tier pagoda in dark oak and red accents with curved roofs, a stone base, a garden with a pond, cherry trees and lanterns along the path.

Frequently asked questions

Can AI turn a picture into a Minecraft build?

Yes. On Spaleforce you upload a reference image and the AI builds the subject in 3D with real Minecraft blocks, starting from the floor plan. You get a furnished build with decor and terrain, exported as a .schem file.

Is this the same as a pixel art converter?

No. Pixel art converters flatten an image into a wall of blocks. Here the picture is interpreted as a building with depth, floors, a roof and interiors.

What kind of images give the best results?

Pictures with one clear building, fully visible, in even light. Concept art, monument photos, screenshots from other games and clean sketches all work well.

What happens to the parts the picture does not show?

The AI builds them so they stay consistent with the visible side: same materials, roof style and window rhythm. They are an interpretation, not a copy of the real back side.

Is it free to convert an image to a Minecraft build?

You can start free with a Google account and no credit card. The free plan includes 5 AI generations or modifications per day; Pro and Ultimate raise that daily allowance, with no credits to buy.

Can I get the result as a schematic?

Yes. The build downloads as a .schem file in the Sponge v3 format, which you paste with WorldEdit or FastAsyncWorldEdit.

Turn your reference image into a build

Pick the picture you keep coming back to and let the AI build it in blocks. Preview it in 3D, then paste the .schem into your world. Free to start.

Upload a reference image

Updated September 17, 2026